Share this
I was accepted into a local women’s leadership program a few years ago, and during one of the program sessions a speaker talked about the importance of SMART goals, a common leadership concept. The idea of SMART goals was not new to me, but there was something from the presentation that jumped out at me: the idea of sharing your goals.
When you share your goals, you invite others to hold you accountable for those goals, thereby increasing the likelihood you will follow through. If I tell you I’m going to start training for a marathon, the next time you see me you may ask how training is going. I will be motivated to have an update for you versus admitting I haven’t run a single step. (Disclaimer: I will probably never set a goal that involves running a sustained distance.)
Who can you share goals with if you’re a solopreneur? Let me introduce you to my good friend Google Analytics. Though not a human being, Google Analytics helps you commit to your goals and establishes accountability. Each time you log in to your account, you will see the progress made toward achieving the goals you’ve set.
If you already have a Google Analytics account, you have what you need to get started with goals!
Don’t have an account yet? This Google support article walks you through creating one in a few minutes so you can join in on the goal-setting fun.
In this blog, I’ll walk you through the technical steps of creating goals in Google Analytics. (Spoiler alert: it’s not as intimidating as it seems.)
Step 1: Define Your Firm’s Website Goals
When you think about your goals, begin by defining what action you want your site visitors to take and the steps they need to perform to achieve that action.
If you want a site visitor to schedule a meeting with you, you may want to create a goal around visits to your “contact” or “schedule a meeting” page. If they must submit a form to contact you, tracking form submissions should be another goal; this will allow you to track both visits to contact (intent) and form submissions (conversions). Other ideas include blog or newsletter subscriptions (if your site offers either) or downloads of resources.
There are four goal configurations you can create in Google Analytics:
- Destination: Visits to a specific location on your website
- Duration: Sessions lasting a specific amount of time or longer
- Page/Screens per session: Users visiting a specified number of pages or screens
- Event: An action defined as an Event is triggered
Note: To create a Goal based on an Event, you will need either a Google Tag Manager account or access to your website’s backend and knowledge of JavaScript.
As you think about the goals you want to create, identify whether they can be tracked through one of the four available configurations.
Google Analytics limits you to 20 goals per property view. Most resources on Google Analytics goals don’t tell you this until the end, but I think it’s important to mention now. If you want to have more than 20 goals, you will need to create additional views to support. Goals cannot be deleted from Google Analytics, but you can revise or edit them if your goals change down the road.

Step 2: Setting Up Your Goals
Within your Google Analytics account, navigate to the Admin section by clicking on the gear in the lower left. Note: If you have access to multiple websites in your Google Analytics account, you will need to be in the website property in which you want to create goals.
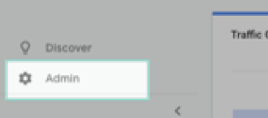
From the Admin screen, click on Goals under the View column (far right).

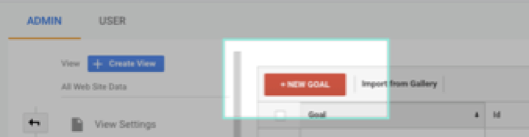
Click +New Goal.
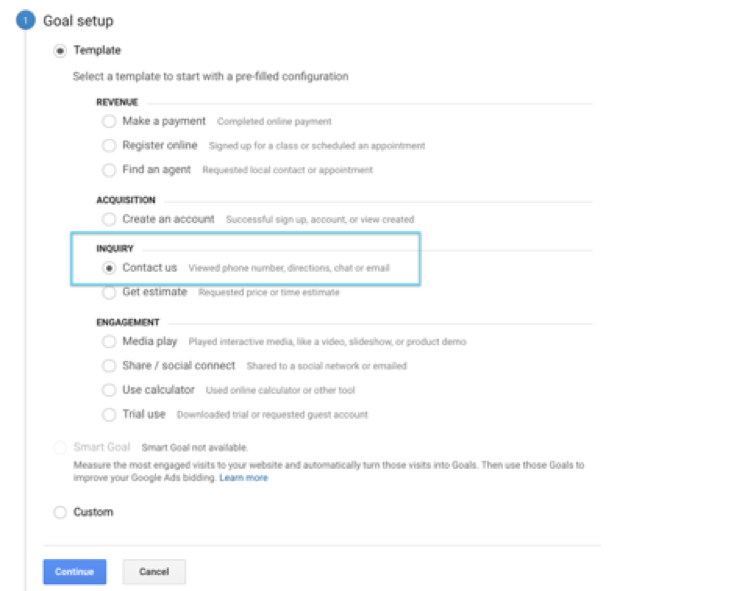
Goal Setup
In Step 1, we talked about the goal of a site visitor scheduling a meeting with you as our desired behavior. How would you measure this goal? Easy. Use the action of someone submitting a form on your Contact page.
Google provides a few templates for goals based on the industry category you selected when you set up your property. If you did not select an industry and would like to have templates available to you, you’ll need to edit your property to include an industry category.
Using our example, I’m going to select the “Contact us” template and click “Continue.”
Goal Description
I chose to use a template goal, which pre-populates the goal “Name” and “Type” fields.
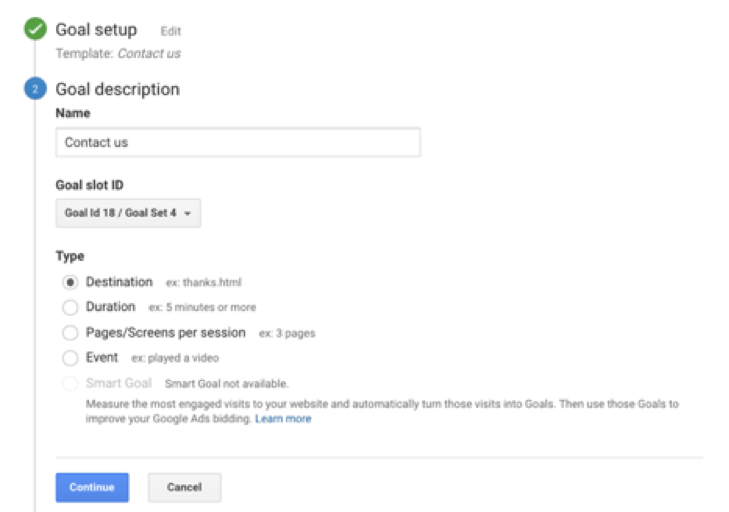
If I had chosen “Custom” instead of using a template in the first step, the goal “Name” and “Type” would be blank at this step.
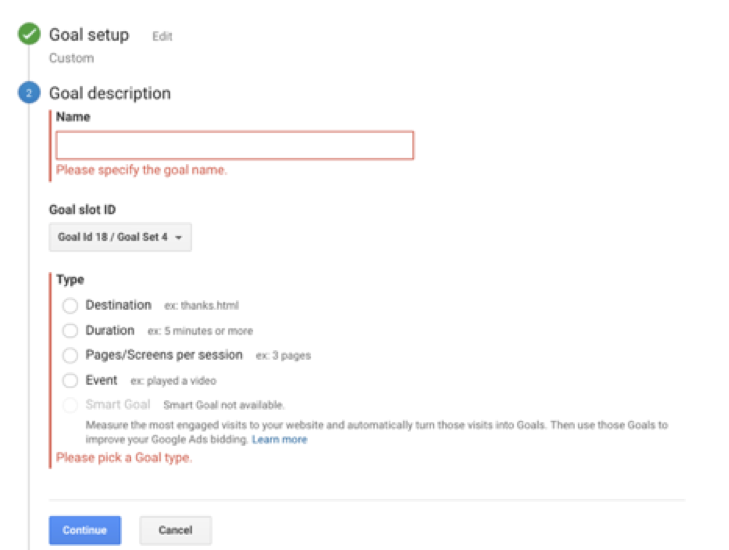
In both the Custom or Template option, you can change the Name and Type at this step. Because you can have up to 20 goals, I recommend being specific with your goal names. I am going to label this one “Submit Contact Form.” I’m tracking this based on the page a site visitor lands on after submitting my contact form, so I want to use Destination as the Type.
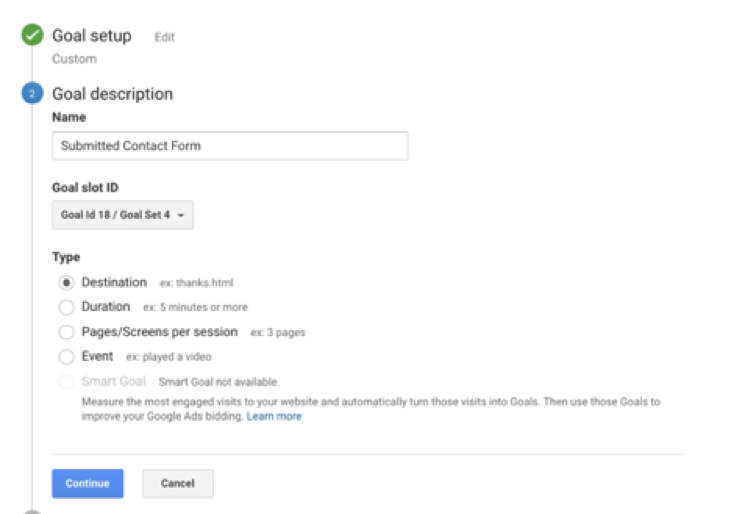
Goal Slot ID
In Google Analytics, the 20 goals are grouped into four sets called Goal Sets. The goal slot ID will populate with the next available ID. If this is your first goal, the value will be labeled Goal Id 1 / Goal Set 1. If you have a series of similar goals, you have the option to group them within the same goal set.
Goal Details
The goal details will vary depending on the goal type selected. In the goal setup, I selected “Destination” for the goal type so I’ll need to define the URL that matches my goal action. For this example, I have a unique page a site visitor is directed to after they submit my contact form. This is the URL I’ll define in the “Destination” field.
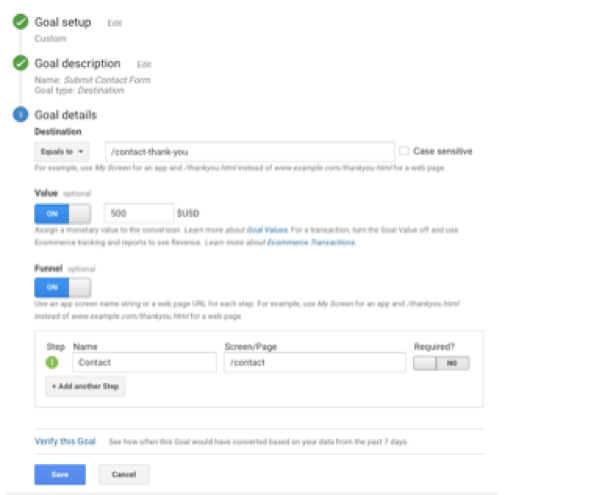
Google recommends giving each of your goals a value. You have the ability to define what these values are and they can be whatever you want, as long as you’re consistent. Let’s say I charge $500 for an initial meeting; I’m going to use that dollar amount for my goal value.
Another optional feature is to identify funnels for your goal. A funnel is a series of web pages you expect your website users to follow to achieve the website goal. I know someone would have to visit the “Contact” page first before submitting this form so I could identify it as part of my funnel. You can learn more about funnels and how they can help identify drop off points in this article.
Before you save your goal, click the “Verify this goal” link. This will calculate a conversion rate for this goal based on your data from the past seven days. This helpful tool ensures you accurately set up your goal. If you were to return a conversion rate of 0% but you know someone submitted the contact form yesterday, you would want to review your goal details for any errors.
Once you verify your goal, you are ready to save. Congratulations! You created your first goal! Continue adding goals (up to 20) following the process in Step 2.
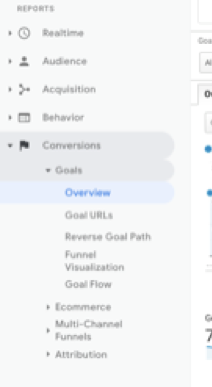
To view your goals, click on “Conversions” from the left menu in your property and expand the “Goals” drop down to choose your view.
If you’ve never used goals, I recommend starting with three to five that measure key data points for your business. As your firm grows and you collect data from your initial goals, you can (and should!) continue to add and refine.
Happy goal-setting!

 About the Author
As XYPN’s Webmaster, Katie DeMars plays a major role in communicating XYPN’s value proposition to the world through digital mediums. Her career experiences span marketing and web roles giving her a unique perspective when approaching each project. Katie is passionate about creating exceptional virtual experiences and is excited to share XYPN’s story through digital platforms.
Share this
Subscribe by email

How to Exceed Your Marketing Goals as a Financial Advisor

A Strategic Guide to Google Search Ads for Growing Advisory Firms